Showing posts with label dessert. Show all posts

Tuesday, June 5, 2012

Drizzled Marble Cake

Purple Cookbook Challenge: Week 5, Day 3
Although I'm very busy these past few days, and haven't had time to post, I have still been in the kitchen cooking and baking for my family.  Cake of the week is the Drizzled Marble Cake (Spice and Spirit, page 366)  I liked the taste of this crumby yet not too dry cake.  My husband, on the other hand, didn't enjoy it too much as he found it too dry (although he did say it was much more moist then the bakery marble cake)

Tuesday, May 22, 2012

No-Egg Cookies

Purple Cookbook Project: Week 3, Day 3.
Yesterday, I made egg kichlach, today it's eggfree.  No, I'm not turning vegan.  I was flipping through the cookie section and came across this recipe.  Funny how I've turned these pages so many times, yet I never noticed this particular one.  It's a simple cookie, with only 4 ingredients (yup you read right, only 4).  This was perfect timing, since I'm having a little guest for Shavuot who has an egg allergy.  Now I'll have a delicious baked snack, of No-Egg Cookies (Spice and Spirit, page 405), for this precious boy.
These cookies are actually very good with that drier texture like bakery cookies.


Tuesday, May 15, 2012

Cream Cheese Pie

Week 2, day 3 of my Purple Cookbook Challenge.
My husbands grew up with very little dairy.  Milchigs was not a dinner or a dessert.  A bowl of cereal in the morning was the extent of the dairy (and not even that for some family members.)  Shavuot meant that after shul they ate a bowl of cereal and some 'milk cake' (the Israeli Shavuot cake made from biscuits and a pudding like filling) and then on to fleish.
Shavuot was always my favorite holiday.  I loved the blintzes and cheesecakes that were made in abundance.  I could not fathom the idea that anyone could really not feel like they were missing out on the lasagnas.  So in my first year of marriage, when I informer my husband of my plans to host his family for a yom tov meal, my style, he was skeptical and told me to make very little dairy and the rest of the meal parve.  
Well, as I entered the kitchen, I couldn't stop at one thing.  I made eggplant parmesan, lasagna, cheese blinzes and more.   I did make some potato blintzes, salmon and a lettuce salad, just in case.  For dessert, I made milchig ice cream and an assortment of cheesecakes and dairy pastries.  My husband was amused and told me that I'll have tons of leftovers.  Not only was that not the case, but the following week  my mother-in-law went out and bought some milchig dishes.  Not everyone caught on to the dairy craze, but I can attest to the fact that from that day forward my husband has been eating cheesecake, eggplant parmesan and lasagna (but without the farmers cheese).  In fact, my husband often asks me to make cheesecake.
Well, cream cheese is on sale this week, so I decided to make a cheesecake for my husband to enjoy.  I made the Cream Cheese Pie (Spice and Spirit, page 109). I prefer the look of cheesecakes baked in a spring-form pan, so I upper the recipe by 33%, and baked it in an 8" pan.  Results: delish!


Monday, May 7, 2012

My Julia Child Project... aka Purple Cookbook Project

I remember when I first watched Julie & Julia. It must have been in '09 or '10, I was on a flight, I think I might have been going to Israel, but maybe it was Florida.  The story weaves the life of Julia Child  and her early culinary career in France and that of a woman named Julie, a New Yorker who wrote a blog about trying to make all the recipes in Julia`s book in just 365 days.
I was very inspired by the movie at the time. I remember thinking how I had to get my hands on Child's 'Mastering the Art of French Cooking'.  When I did get a look in the book, I realized that I would not be able to try all her recipes, as she is a firm believer of using real butter. Lots of it.  Being that I keep kosher, that just wouldn't work.
Recently, I was looking through 'The Spice and Spirit', aka 'Purple Cookbook' aka 'The Bible of the Kitchen'.  I thought about how this used to be my go to cookbook for everything and has many great recipes.  Over the past few years, this cookbook took back stage, not because of its lack of quality, but because so many great cookbooks came out, that have beautiful pictures.  The pictures help wet your appetite and makes it so much more exciting to try the recipes.
I decided to use the inspiration from Julie Powell, and go through all the recipes in the 'Purple Cookbook'.  I'm going to document them all with pictures, and bring this cookbook back to the glory it deserves.  But unlike Julie, I don't plan to neglect my family, quite the contrary.
To please the family, I decided to start by baking a cake.  Who doesn't appreciate a fresh baked cake.  The black devil's food cake on page 356.  Although it's not as moist as I would have liked it, it was still a really decent cake, as I can see by the almost finished pan.


Thursday, April 26, 2012

Cookies and Cream!

I’ve been gone for a while now, but with good cause.  I finally moved into my new home, a week before Pessach.  Great to be finally in my own place, although there is still much to do to have it totally put together.   That and having a 4 month old baby took up much of my time and energy.
I’m having so much fun getting acquainted with my new kitchen.  Although I’m not completely unpacked (far from that, in fact)  G-d willing, I'll post before and after pictures , of the kitchen, soon.
Today, I was in the mood for Oreo type sandwich cookies.  Taking advantage of my baby's nap,  I did a web search.  This recipe is a combination of a few recipes I found online.  Not exactly the same as the real thing, but still a delicious crispy cookie with cream filling (especially dipped into a glass of milk)
Chocolate Cookie/Wafer
(Makes about 48 cookies, 24 sandwich cookies)
  • 1 1/4 cups all-purpose flour
  • 1/2 cups unsweetened cocoa
  • 1 teaspoon baking soda
  • 1/4 teaspoon baking powder
  • 1/4 teaspoon salt
  • 1 cup sugar
  • 1/2 cups plus 2 tablespoons margarine, room temperature
  • 1 large egg
Preheat over to 375 F. 
In a medium-sized bowl, mix the flour, cocoa, baking soda and powder, salt, and sugar. 
Beat in the margarine and the egg. Continue mixing until dough comes together in a ball. 
Roll out dough 1/4 inch thick.  Using a cookie cutter (or a spice cover, as I did, since my cookie cutters have yet to be unpacked), cut out into 1" - 1 1/2" round. Place on a parchment paper-lined baking sheet approximately 2 inches apart.
Bake for 9 minutes

Filling


  • 3 3/4 cups powdered sugar
  • 1/2 tablespoon granulated sugar
  • 1/2 teaspoon vanilla extract
  • 1/2 cup Crisco
  • 2 tablespoons hot water

As the cookies bake, make the filling by combining the filling ingredients with an electric mixer.
To assemble the cookie, take a spoon full of cream and roll into a ball.  Flatten between 2 cookies, flat sides facing each other.  This is your chance to pick the amount of filling.  Go ahead and double, or even triple the cream.  (And for those who only each the cream in the sandwich cookies anyways, go ahead and grab a spoon)
My kids love looking through the "window" as things bake
Yum!


Up and ready to play,
as the last batch came out.
After school snack.
Perfect with a cup of milk.


All you need now, is to fill up your glass with milk and enjoy,
Chanie

Tuesday, December 20, 2011

Chanukah Party Made Easy

It's been a few months since I posted anything here.  Pregnancy took over my summer and beyond, but B"H, 2 weeks ago I gave birth to boy #4.  He is such a perfect addition to our family.  Once I get past the initial new mommy faze, I hope to get back to blogging in full swing.
Being that Chanukah started tonight, I felt a need (during my few sitting moments) to post some quick Chanukah party ideas.
I love to play host, and what better time then Chanukah, when we have 8 nights to party.  I usually make a few parties for family and for friends.  (Obviously, this year will be different, still haven't gotten into the full swing of supper making, never mind planning and hosting a party, but we will try to make sure the Yom Tov will be exciting for my kids anyways)
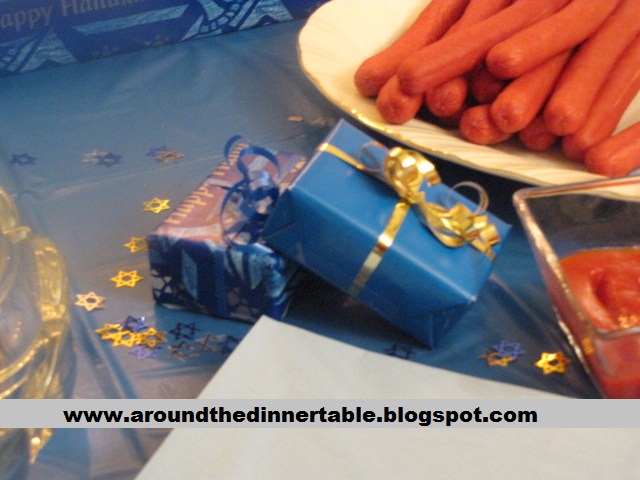
Picking a color scheme, helps pull the look of the party together and gives it a more finished polished look.  For this party, I chose to stay with the classic blue.  I decorated the table in the Chankah gift theme. 
For the center piece, I covered a box (shhh, it was actually 2 lasagna boxes) with chanuka wrapping paper to create the base for the Menorah.  I filled glass cups with sugar and used tall blue candles to complete the Menorah.

I decorated the table with mini "gift boxes" (soap boxes covered with wrapping paper and tied with curling ribbon)  and Chankah confetti.

I served the party buffet style.  Although the tradition is to serve milk on Chanuka, I chose to serve meat at this party.  I set up stenos with kid (and adult friendly) foods.  My menu included sweet and sour meatballs, rice, french fries, latkes and hotbogs (invited  families with kids so had to keep the menu simple)  along with a vegetable platter.  On the dessert side, I served chocolate donuts drizzled with blue glaze, mini cupcakes with blue and brown frosting, (notice the cupcake stand:  made up of presents as well), dreidel cookies and an apple trifle with strawberry sauce.


Blue and brown icing top the mini cupcakes displayed on a gift box cupcake stand.


I tried keeping the drinks in the color scheme as well....  I made blue lemonade by adding some wilton food coloring to regular lemonade. 


Chocolate Donuts (credits for this recipe goes to the Spice and Spirit cookbook, although I do modify the recipe a bit)
  • 4 1/2 tsp. dry yeast
  • 1/4 cup warm water
  • 2 tsp. sugar
  • 1 egg
  • 1/2 cup water
  • 1/2 cup orange juice
  • pinch salt
  • 3 Tbs. margarine
  • 1 Tbs. oil
  • 1/3 cup sugar
  • 4 1/4 cups flour
  • Oil for deep frying
Ganache topping:
 
  • 1 cup dessert topping
  • 9 oz. chocolate chips
  • 1 tsp. vanilla
Blue Glaze
  • 1 cup confectioners sugar
  • 1 Tb. oil
  • 4-5 Tb. water
  • 1/2 tsp. vanilla extract
  • a few drops blue food coloring
Dissolve yeast in water and sugar, in a large bowl.  Allow to sit for a few minutes until yeast starts to bubble.  Add remaining ingredients and knead until smooth (apx 10 minutes in machine, longer if kneading by hand)
Cover dough and allow to rise till doubles, apx 1 hour.
Roll out dough on floured surface to 1/4" thick. Using either a doughnut cutter or 2 different size cookie cutters (one large and one small) cut out doughnuts.  Allow to rise for 30 minutes.
 
Heat 3"-4" of oil in a pot until hot but not smokey. Fry only a few doughnuts at a time, they cannot be crowded or they will not rise properly.  Fry with the cover on.  When golden, turn over and fry other side.  Remove from pot and drain on paper towels.
 
For icing: Heat whipping cream till just begins to bubble, remove from heat.  Add chocolate chips and allow to sit for 1 minute.  Stir in chocolate chips till melted and smooth.  Add vanilla and mix.  Allow to cool.
 
Dip doughnuts in chocolate.  Allow to set (won't harden, remains a delicious creamy chocolate on top)

Mix the glaze ingredients together adding the water only a bit at a time till it reaches a thick but pourable consistency.  Drizzle glaze over iced donuts.

Wishing you and your family a happy Chanukah!

Chanie

Wednesday, July 6, 2011

Easy Rainbow Ices

I have such find memories of summertime in Crown Heights, stopping at Nosh World for a scoop of rainbow ices.  The other day I decided to make some for my own kids (who don't have Nosh World just around the corner)  The recipe I made was super easy and I'm sure a lot healthier then the original.  It till is flavored artificially, but at least it has the added benefit of being made with pure fruit juice too.
It has been a while since I have had rainbow ices, but I think this tasted pretty similar to what I remember.  The ices are also the prefect texture.
I used lime and raspberry flavors but feel free to pick your own family's flavor, or make it with more then 2 colors.


Easy Rainbow Ices
for each color:
  • 1 package jello dessert (flavor of your choice)
  • 1 cup boiling water
  • 1 cup orange juice
  • 1 cup pineapple juice
  • 1/4 cup sugar

Dissolve jello in boiling water.  Add both juices and sugar, stir quickly to prevent jello from setting before mixed in. (If it sets too quickly, don't worry, as it will all be combined properly when blended later)
Freeze each color in separate containers till completely frozen (a few hours or can take overnight).
Place one color at a time in the blender and blend till smooth.
Place one large spoonful at a time into container, alternating colors.  Return to freezer to refreeze.

Enjoy,
Chanie

Friday, June 3, 2011

National Doughnut Day

Today is National Doughnut Day.  Are you celebrating?  Although I could never refuse a good fresh doughnut, I think I'll forgo this holiday this year (and possibly every other year)  We have our own doughnut holiday, on which every year I go into my kitchen, roll up my sleeves and produce yummy chocolate covered fried doughnuts (they got to be fried, or they just don't cut it.)
In honor of the woman who served the doughnuts to the troops during World War I, I will post below the recipe I use for my Chanukah doughnuts, which is always finished to the last drop. 
Fried doughnuts have to be eaten when they are fresh.  They do not taste good when  stored for the next day.  The batter however can be covered and placed in the refrigerator overnight.


Delicious Doughnuts
  • 4 1/2 tsp. dry yeast
  • 1/4 cup warm water
  • 2 tsp. sugar
  • 1 egg
  • 1/2 cup water
  • 1/2 cup orange juice
  • pinch salt
  • 3 Tbs. margarine
  • 1 Tbs. oil
  • 1/3 cup sugar
  • 4 1/4 cups flour
  • Oil for deep frying

Ganache topping:
  • 1 cup dessert topping
  • 9 oz. chocolate chips
  • 1 tsp. vanilla

Dissolve yeast in water and sugar, in a large bowl.  Allow to sit for a few minutes until yeast starts to bubble.  Add remaining ingredients and knead until smooth (apx 10 minutes in machine, longer if kneading by hand)
Cover dough and allow to rise till doubles, apx 1 hour.
Roll out dough on floured surface to 1/4" thick. Using either a doughnut cutter or 2 different size cookie cutters (one large and one small) cut out doughnuts.  Allow to rise for 30 minutes.

Heat 3"-4" of oil in a pot until hot but not smokey. Fry only a few doughnuts at a time, they cannot be crowded or they will not rise properly.  Fry with the cover on.  When golden, turn over and fry other side.  Remove from pot and drain on paper towels.

For icing: Heat whipping cream till just begins to bubble, remove from heat.  Add chocolate chips and allow to sit for 1 minute.  Stir in chocolate chips till melted and smooth.  Add vanilla and mix.  Allow to cool.

Dip doughnuts in chocolate.  Allow to set (won't harden, remains a delicious creamy chocolate on top)

Yum!

Have a good shabbos,
Chanie

Thursday, June 2, 2011

Dairy Cinnamon Twists

With all the cheesecakes and other heavier desserts on the menu, I thought a lighter dairy cookie was in order.  I combined a few recipes to come up with this one.  It has a taste closer to a cinnamon bun then the crispy twists sold in the stores.


Cinnamon Twists
  • 1 cup sour cream
  • 3 tbs. sugar
  • 1/8 tsp baking soda
  • 1 tsp salt
  • 1 package yeast (2 1/4 tsp.)
  • 1 egg
  • 2 tbs. shortening
  • 1 tsp. vanilla
  • 3 cups all purpose flour
  • butter, softened
  • 1 cup sugar
  • 1 tsp. cinnamon
Icing:
  • 1 cup confectioners sugar
  • 1/4 tsp vanilla
  • about 2 tbs. milk
In a large sauce pan heat the sour cream until lukewarm; remove from the heat. Add the sugar, baking soda, salt, and yeast and mix well. Allow to sit a few minutes.
Beat in the egg, shortening, and vanilla to the sour cream mixture until combined.  Add flour one cup at a time.   Turn out onto a lightly floured surface.  Knead apx. 10 minutes.  Divide dough in 1/2. Roll out each into a 6 inch by 12 inch rectangle.
Spread each rectangle generously with butter. Mix sugar and cinnamon in small bowl. Sprinkle a layer of  cinnamon-sugar onto the buttered dough.  Pass rolling pin over dough.  Fold the rectangles in half the long way.  Again pass rolling pin over with only a little pressure. Cut both filled doughs into 1 inch thick strips. Twist each strip and place on parchment lined cookie sheets.  Place the twists close enough to each other that they hold the shape of the twist but not pushes together.
Cover and allow to rise for one hour
Bake at 375 degrees for 12 to 15 minutes or until golden brown. Cool.
While the twists are cooling prepare the icing. In a bowl combine the confectioners sugar, vanilla, and enough of the milk to make the glaze drizzle easily. Drizzle the icing over the twists.

Enjoy!
Chanie

Thursday, May 26, 2011

Miniature Cheesecake Trifles - Shavuot Miniature Desserts

Just the other day, I  stopped at the dollar store to pick up a couple of things, and came across the cutest mini stemmed cups and mini spoons.  I just know I had to figure out something go do with them for Shavuot.   I decided to use no-bake cheesecake filling to make a simple, easy yet very presentable dessert.
I made a milk chocolate and a plain cheesecake mixture and made different combination using different toppings I had on hand.  Do feel free to try your own favorite topping.


Milk Chocolate Cheese Filling
  • 1/2 cup whipping cream
  • 7 oz. good quality milk chocolate (plain without and filling) - melted and cooled
  • 7 oz. cream cheese

Whip the whip cream till peaks form.  fold in melted chocolate.  In a separate bowl, whip cream cheese till creamy.  Fold cream cheese into chocolate mixture.

No-bake Cheesecake Filling
  • 16 oz. cream cheese
  • 5 Tbs + 1 tsp. sugar
  • 2/3 tsp. vanilla
  • 1 cup whipped cream

Mix cream cheese, sugar, and vanilla together till smooth.  Fold in whip cream.


Chocolate Peanut Butter Crunch

Choc. art, blueberry, and choc. curl


Topping Ideas:
  • fresh fruit (I used blueberries)
  • grated chocolate or chocolate curls
  • chocolate "art" : melt chocolate chips.  Can draw any shape by placing in sandwich bag.  Make a small at the tip of the bag and pipe design onto wax paper.  Place into freezer to harden.
  • chocolate-peanut butter crunch (recipe follows)
Chocolate Peanut Butter Crunch
  • 3 1/2 oz. chocolate chips - melted
  • 1/3 cup peanut butter (can use crunch or smooth)
  • 1 1/3 rice crispies

Mix melted chocolate and peanut butter together, until completely combined.  Stir in rice crispies.  Press onto baking pan and place in freezer for 10 -15 minutes to harden.  Crumble and use as topping.  (I placed this on bottom, in middle and on top of my trifle)

Enjoy,
Chanie

Wednesday, May 25, 2011

Decadent Cream Cheese Truffles - Shavuot Miniature Desserts

I love dairy foods and desserts, after all who doesn't, so it's probably doesn't come as much surprise that I look forward to a Yom Tov, that is not all about the roast (yes, we got to make some of that too, but at least I can put emphasis on something other then that).
I find great pleasure in offering a variety of desserts, but find that at the end of the day, I have a bunch of open cheesecakes. Although they still taste as good, it doesn't look as presentable to reserve.
This year, I decided to make a miniatures dessert table.  Over the next couple of weeks, I hope to try all different recipes to include on my Yom Tov Viennese table.
A few weeks ago, my husband was flipping through a cookbook, in my mother's house, and came across a picture of cheesecake truffles.  He thought they looked delicious....  I don't remember which cookbook it was (so I cannot call my mother, since my mothers cookbook collection is pretty big) but remember the basic ingredient.  Since it came out delicious, I must have gotten it correct.  I thought it would look and taste fabulous, dipped in milk and white chocolate.


Truffles before coating


yum!


  Decadent Cream Cheese Truffles   (makes apx. 60 truffles)
  • 1 (8 ounce) package cream cheese, softened
  • 3 cups confectioners' sugar, sifted
  • 3 cups semisweet chocolate chips, melted
  • 1 1/2 teaspoons vanilla extract


Beat cream cheese till smooth.  Slowly add confectioners sugar until completely blended.  Stir in melted chocolate and vanilla until well blended.  Refrigerate 1 hour to firm.  Shape into small 1" balls.  Return to refrigerator to firm up before dipping in chocolate coating.

Chocolate Coating
  • 2 bars (3.5 oz each) white chocolate
  • 2 bars (3.5 oz each) milk chocolate
Melt each type of chocolate separately in double boiler, or fondue.  Take a lot of care when melting chocolate.  Melt on low heat (too much heat will mess up the texture) and make sure the chocolate doesn't get into contact with any water.  Dip half the truffles in milk chocolate and half in white chocolate.  Drizzle truffles with opposite chocolate then coated in.
Keep in fridge till ready to serve.  Freezes well, so great to make ahead for Shavuot.

My husband proclaimed this 'melt in your mouth goodness!'

Enjoy,
Chanie


Tuesday, May 24, 2011

Rainbow Cookies

A few weeks ago, Evening With Friends (our local Chabad women's organization), had a Yom Iyun.  It was a full day of workshops, on the topic of raising our children.  It started with coffee and cakes in the morning, Stopped for a nice hot lunch, then the main speaker and after a few hour break there was an evening session which the men were invited to as well.
It was a really great day, from which I walked away feeling I've come out with a lot of great insight.  For this years main speaker, they brought out Rabbi Manis Friedman.
I was asked to make some sort of baked good for the evening cake table.  I made rainbow cookies.    Although these cookies look beautiful, they are fairly easy to make.
I made the recipe from the Spice and Spirit cookbook (aka The Purple Cookbook)


Tri-Color Cookie Squares

for each layer (so you need each of the following ingredients times 3):
2 eggs
1/2 cup sugar
1 cup flour
1 tsp. almond extract
food coloring (one layer each on red, yellow and green)
1/2 cup margarine (melted and cooled)

Preheat oven to 350. Grease three 10" x 15" jelly roll pans and line with parchment paper.  (if you don't have three pans, just make one layer at a time, as it bakes and cools pretty quickly) Prepare each layer separately. Beat eggs and sugar together. Add flour, extract and and a few drops of ).  Continue beating till mixed well (apx 2 min) Fold in cooled margarine.  Pour into prepared pan and spread evenly being sure to reach all the corners.   Bake for 12 min.

filling and glaze:

32 oz jar raspberry jam
1/3 cup margarine
1/2 cup cocoa
1/3 cup nondairy creamer
1 tsp. vanilla extract
2 1/2 cups confectioners sugar

Spread apx 1/2 cup jam between layers, pressing gently on layer to make sure the layers are completely joined.
In a saucepan, melt margarine, and stir in cocoa.  Cook for 1 minute. Remove from heat and add remaining ingredients.  Mix till smooth.  Spread over cake while glaze is still hot and easily spreadable.  Allow to cool and harden completely before cutting into 2" x 1" cookies.

Enjoy,
Chanie


Tuesday, March 8, 2011

Chewy Brownies

I'm infamous for not reading directions.  Most of the time, things turn out okay (read, most of the time. Unfortunately, I have caused some mishaps because of my carelessness.)  Fortunately, this recipe was more a hit then a miss.  2 years ago, for my classes 10 year high school reunion, the amazing organizers put together a cookbook that we all contributed to.  For over a year , I made a certain brownie recipe, which was rich, chocolaty and yummy.  One day, someone asked me for the recipe, and as I was reading it to them, I realized that I never read the part about melting the chocolate chips, I just mixed it in at the end.  I still haven't tried it Sara's way, but I still have her to thank for this simple, throw into one bowl, wonderful recipe.

Chewy Brownies
  • 2 1/4 cup sugar
  • 1 1/4 cup cocoa
  • 1/2 tsp. salt
  • 1 tsp. baking powder
  • 1 Tablespoon vanilla
  • 4 eggs
  • 1 1/2 cups flour
  • 1 cup oil
  • 2 cups chocolate chips
Preheat oven to 350.  Grease and flour a 9'x13' pan. Mix all the ingredients except the chocolate chips, it a bowl (can be done by hand).  This will be a very thick dough.  Mix in the chocolate chips. Bake in prepared pan for 25-30 minutes.  DON'T over-bake!
For a beautiful presentation, use cookie cutters and dust with confectioners (icing) sugar.


Enjoy,
Chanie

Wednesday, February 23, 2011

Chocolate Kahlua Cake

My family are addicted to the Amaretto cake I often make for shabbos posted on this site:  Moist And Delicious Amaretto Cake.  I decided to play around with the recipe to create something of similar texture but a whole new cake.  Thus was born my chocolate Kahlua cake.  The cake was moist and chocolaty as expected and had a subtle taste on the Kahlua that imparted a distinct taste.  Although all Kahlua is produced in Mexico and is kosher, the Kahlua bottled in the US is not kosher due to the bottling facility that bottles non-kosher items as well on the same machines.  Kosher Kahlua can be purchased on a trip to Mexico, but that is out of reach for most of us.  Some kosher liquor stores have been selling Kahlua imported from Mexico, but if you cant get your hands on that, you can substitute it with another coffee liquor such as the one packaged by Ebers.

Chocolate Kahlua Cake
  • 2 cups flour
  • 2 cups sugar
  • 1 package instant chocolate pudding mix
  • 2 teaspoons baking powder
  • 1/2 cup cocoa dissolved in 1/2 cup hot water
  • 4 eggs
  • 2/3 cup oil
  • 1/4 cup Kahlua (or other coffee flavored liquor)
  • 1/4 cup vodka
Preheat oven to 350.  Grease and flour bundt pan.  Mix all ingredients in large bowl till smooth.  Pour into pan.  Bake for 1 hour till toothpick test comes out clean.
Remove from pan when completely cool to prevent cake from falling apart.
Dust with confectioners sugar before serving.


Enjoy,
Chanie

Wednesday, February 9, 2011

Kids In The Kitchen #3 - Chocolate Peanut Butter Bites

Now what is a better food combo then chocolate and nuts.  Think of Dellinut, chocolate covered peanuts, Reese's cereal, and of course chocolate peanut butter cups.  Today, my kids and I fiddled in the kitchen to make our own peanut butter treats.  We created a delicious melt in your mouth treat.  These confections have a bit of a crunch, thanks to the rice crispies added to the peanut mixture.

Because the trans-fat free margarine doesn't tend to harden up as much as regular margarine, it's best to serve these straight from the fridge.

This is a recipe easy enough for the children to do on their own.  Turn on the flame for them and take this chance to teach them about safety near the stove. 

Chocolate Peanut Butter Bites
Prepare a 9"x13" pan by placing parchment or wax paper on bottom.
First Layer
  • 1 cup peanut butter
  • 1 cup J&J trans-fat margarine
  • 1 cup icing sugar
  • 1 1/2 cup rice crispies
Second Layer
  • 1/4 cup trans-fat margarine
  • 1/2 cup peanut butter
  • 1 cup chocolate chips
  • 1/2 cup icing sugar

Melt peanut butter and margarine on top of double boiler.  Add icing sugar and mix till fully combined.  Stir in Rice Crispies.  Pour into prepared pan and allow to firm (can place in fridge to speed up the process)
Melt margarine and peanut butter on top of double boiler.  Remove from flame and immediately stir in chocolate chips till completely melted.  Add icing sugar, and mix.  Pour over layer 1 and place in fridge till firm.
Use cookie cutters to cut shapes or a knife for bars.  Store in fridge.


Have fun,

Chanie

Wednesday, February 2, 2011

Chocolate Overload - Triple Chocolate Cookies

My youngest comes home from school an hour and a half before his brothers each day.  That is just about the hardest hour of the day (okay, that and bedtime)  From the moment I get to Shmuli's classroom, he starts complaining how bored he is and he needs to go to someones house (we haven't even gotten our boots on, and he's already bored).  Sometimes we do have play dates, but not everyday.  Yet I want to keep the peace, so I often have to entice him home with a fun activity.  Today, I promised him that we would bake cookies together.  It worked!  He rushed home with a smile.
At first I was going to make the regular chocolate chip cookies that I know my family likes, but when I went to look for the chocolate chips, I realised I don't have enough for a full batch.  Jotted it down on my weekly Wednesday night shopping list and decided to fill in the remainder amount I needed with white chocolate chips.  Next as I started to take out the ingredients, I decided that I wanted to make the recipe more healthy, so there went the margarine, and then switch out some of the flour for whole wheat. And while making all the changes, I realized my recipe had no similarities to the original recipe.  Oh well, might as well change it some more and make it a chocolate cookie....
The results:  a perfect soft chocolate chocolate chip cookie.

Chocolate Overload - Triple Chocolate Cookies

  • 2 eggs
  • 1 cup oil
  • 3/4 cup brown sugar
  • 3/4 cup sugar
  • 1 teaspoon vanilla
  • 1 teaspoon baking powder
  • 1 cup whole wheat flour
  • 2 cups all purpose flour
  • 1/4 cup cocoa
  •  mixture of  white and chocolate chips equaling to 3/4 cup total
Preheat oven to 350.  Line cookie sheets with parchment paper.  Mix eggs, oil, sugar, and vanilla at medium speed till thick (3 minutes).  Add rest of ingredients except chocolate chips and mix.  The dough will be very thick. Add in chocolate chip, you may have to knead with your hands at this point, because the dough takes on a almost yeast like texture.  Form walnut sized balls.  Bake at 350 for 8 minutes.  Allow to cool for a few minutes to allow it to firm up before removing to cooling rack to finish cooling process


Enjoy,
Chanie

Sunday, January 30, 2011

Moist And Delicious Amaretto Cake

Thirteen years ago, my sister and her family were invited by a friend to join her family for Purim seuda.  My sister turned her down, to join the meal my parents were hosting for all of us.  Her friend graciously accepted being turned down, and sent something for our family to enjoy that Purim.  My sister came in with the cake  that her friend sent and placed it on the table while my mother got ready to serve the meal. My mother left the room for under 5 minutes and when she returned to try the cake, the entire bundt cake was already devoured.
The cake was perfect, it was taste and moist without being heavy.
Fast forward six years, the cake has not been mentioned in all that time.  I was sitting in my kitchen going through some cookbooks, trying to find the perfect cake.  My memory took me back to my parents dinning room a few years earlier.  That Purim, we were all still living in Brooklyn.  I think that might have been one of the last Yom Tov meals we all actually ate together as a family before we all started moving away.  (To get us together at one time isn't as easy these days, there are six of us in three countries, six different cities.)  So I wondered, was the cake really as good as memory, or could it have been made great by the memory.  I had to track down that recipe and try it. 
When I called my sister to ask her to try tracking down the recipe, she too started reminiscing the taste.  Now we knew we had to get it.  She promised to call the friend and fin out if she still had the recipe.  Of course she did, and the cake didn't disappoint my memory.  The cake has now become the most requested in my house and always gets tons of compliments when I send it over to friends.  Not only in this cake fabulous tasting but its a super easy one bowl cake. The cake is delicious as is or dusted with icing sugar, but I found that the glaze I experimented with compliments it beautifully.

Amaretto Cake
  • 2 cups flour
  • 2 cups sugar
  • 1 package instant vanilla pudding (I find its best with Jello brand pudding mix)
  • 2 tsp. baking powder
  • 4 large eggs
  • 3/4 cups orange juice
  • 2/3 cup oil
  • 1/4 cup vodka
  • 1/4 cup amaretto

Preheat oven to 350.  Grease and flour a bundt pan. Place all ingredients in bowl of mixer and mix at medium speed till smooth.  Pour batter into pan and bake in oven for 1 hour or until toothpick test comes out clean.
Allow to cool for 10 minutes, then turn over on cooling rack and continue to cool in pan.  Don't remove from pan until completely cool or you will break the cake.

Almond Glaze
  • 1/2 cup icing sugar
  • 1/2 teaspoon almond extract
  • 3-5 teaspoons water

Place sugar and extract in small bowl.  Add water one teaspoon at a time and mix till reaches a smooth, thick but pourable consistency.  Drizzle glaze over cooled cake.


Till next time,
Chanie