Monday, January 31, 2011

Effortless Silver Polishing

I have tons of patience when it comes to decorating or baking... I can get lost in time.  But when it comes to other housework, I'm the biggest procrastinator.   One of my worst chores, is silver polishing.  I have real knack for pushing that off.  In fact this past Shabbat, I was looking at my candlesticks and marveled at the many colors of tarnish that developed on it.  Although it was rather unique looking, I still decided that as soon as my week began, I would tackle it.
Well Monday morning came, and I really could not bring myself  to take out the silver polish. I hate the way everything that gets touched with the silver polish gets black, I hate the way the polish gets stuck in the small crevices leading to hours or Q-tip work... There had to be a better way out there.
I searched the internet and learnt a bit of chemistry.  You can make a  electrochemistry dip out of regular household products.  By using a solution of hot water, baking soda and salt, along with a piece of aluminum foil, you can make an easy dip that takes off the tarnish from your silver without any scrubbing at all.

What you need:
  • tarnished silver
  • hot water
  • baking soda
  • salt
  • aluminum foil
  • sink or large glass bowl
Line bottom of sink or bowl with aluminum foil.  Add hot water and dissolve baking soda and salt.  I found that for a medium size bowl, I needed approximately 2 teaspoons each of baking soda and salt.  You'll need more for large bowls or sink. Leave tarnished items in water for 1-5 minutes, until you see that the tarnish is no longer there.  Wipe dry with soft towel.


Before and after

Silver soaking in solution.


Have a good day,
Chanie

Sunday, January 30, 2011

Moist And Delicious Amaretto Cake

Thirteen years ago, my sister and her family were invited by a friend to join her family for Purim seuda.  My sister turned her down, to join the meal my parents were hosting for all of us.  Her friend graciously accepted being turned down, and sent something for our family to enjoy that Purim.  My sister came in with the cake  that her friend sent and placed it on the table while my mother got ready to serve the meal. My mother left the room for under 5 minutes and when she returned to try the cake, the entire bundt cake was already devoured.
The cake was perfect, it was taste and moist without being heavy.
Fast forward six years, the cake has not been mentioned in all that time.  I was sitting in my kitchen going through some cookbooks, trying to find the perfect cake.  My memory took me back to my parents dinning room a few years earlier.  That Purim, we were all still living in Brooklyn.  I think that might have been one of the last Yom Tov meals we all actually ate together as a family before we all started moving away.  (To get us together at one time isn't as easy these days, there are six of us in three countries, six different cities.)  So I wondered, was the cake really as good as memory, or could it have been made great by the memory.  I had to track down that recipe and try it. 
When I called my sister to ask her to try tracking down the recipe, she too started reminiscing the taste.  Now we knew we had to get it.  She promised to call the friend and fin out if she still had the recipe.  Of course she did, and the cake didn't disappoint my memory.  The cake has now become the most requested in my house and always gets tons of compliments when I send it over to friends.  Not only in this cake fabulous tasting but its a super easy one bowl cake. The cake is delicious as is or dusted with icing sugar, but I found that the glaze I experimented with compliments it beautifully.

Amaretto Cake
  • 2 cups flour
  • 2 cups sugar
  • 1 package instant vanilla pudding (I find its best with Jello brand pudding mix)
  • 2 tsp. baking powder
  • 4 large eggs
  • 3/4 cups orange juice
  • 2/3 cup oil
  • 1/4 cup vodka
  • 1/4 cup amaretto

Preheat oven to 350.  Grease and flour a bundt pan. Place all ingredients in bowl of mixer and mix at medium speed till smooth.  Pour batter into pan and bake in oven for 1 hour or until toothpick test comes out clean.
Allow to cool for 10 minutes, then turn over on cooling rack and continue to cool in pan.  Don't remove from pan until completely cool or you will break the cake.

Almond Glaze
  • 1/2 cup icing sugar
  • 1/2 teaspoon almond extract
  • 3-5 teaspoons water

Place sugar and extract in small bowl.  Add water one teaspoon at a time and mix till reaches a smooth, thick but pourable consistency.  Drizzle glaze over cooled cake.


Till next time,
Chanie

Thursday, January 27, 2011

Hearty Lentil Soup and Garlic Bread

We can pretend its not here, but its inevitable.  The wind that hits us as we trudge home!  My husband is definitely does the trudging.  He walks 2km to work and 2 back, whatever the weather.  Be it a mid-summer hear wave or when it's -40 in the winter (by the way, -40 is the point where Celsius and Fahrenheit meet) And when my husband gets home these days, a hearty hot bowl of soup is exactly what this weather calls for.   This lentil soup is really fulling, especially with the garlic bread that I like to serve on the side.

Hearty Lentil Soup
  • 1 Tbs olive oil
  • 1 large onion - large dice
  • 6 cloves garlic - chopped
  • 2 medium zucchini - diced'
  • 2 tsp. oregano
  • 6 cups clear chicken soup (or Osem soup mix plus water = 6 cups)
  • 1 cup dry red lentils
Heat olive oil in large pot.  Saute onion till just begins to brown.  Add garlic and zucchini and continue to cook for 5 minutes, stirring occasionally.  Add oregano and chicken soup.  Bring to boil, then lower to simmer.  Cook covered for around 20 minutes, till zucchini is soft. Blend with immersion blender (or in batches in regular blender - return to pot)  Add lentils and cook till soft, 10 - 15 minutes.

Garlic Bread
  • 2-12" frozen baguettes (I buy by the case in Costco's - can use 1 already baked French or Italian bread)
  • 1/4 cup olive oil
  • 3 tsp. garlic powder
  • 1 1/2 tsp. salt
  • 2 tsp dry parsley (or 2 Tbs. fresh parsley - finely chopped)

Bake frozen baguettes according to package directions.  Slice every 3/4 inch leaving some at bottom connected.  Mix olive oil, garlic, salt and parsley in small bowl.  With basting brush, spread garlic mixture between slices.  Spread remaining mixture over whole loaf.  Wrap in aluminum foil.  Bake at 350 for 10-15 minutes.


Enjoy,

Chanie

Wednesday, January 26, 2011

Kids In The Kitchen #2 - Snow Ice Cream

-10ºC doesn't  seem so cold anymore, after the weather we had over the weekend.  I'm practically searching for my flip-flops and beachwear. With the warmer weather, comes the snow (anyone who lives in a cold climate, knows that if its snowing, then it's not bitter outside.  In fact, if its really sunny outside, when you cant look at anything outside without squinting because of the way the sun reflects off the snow, you know that its a frigid day)  We haven't had a lot of snow, nowhere near you poor New Yorkers, who are once again being hit with a storm (what number storm are you up to anyways?), but we has been a steady flurry all day.  Early in the morning I put a wide rimmed bowl, out on the back porch to collect the fresh snow as it falls.  Today we are making Snow Ice Cream!  This is the perfect snow day activity for the kids, and has delicious results.   Just make sure to catch fresh snow, as it's not an appetising thought to eat that greying snow that fell 2 days ago.  Today we made 2 flavors, vanilla and mint (my 8 year old's favorite flavor of ice cream).  The vanilla version I've made with my kids for the past few winters, I think I found it on the internet years ago.  The mint version was done with my boys creativity.  My boys gave a thumb up for the ice cream, but do eat it fast, as you can see from the picture, it starts melting really quick.
So, to our New York friends, make the best on the snow... make some snow angels and of course some snow ice cream.

Vanilla Snow Ice Cream
  • 4 - 5 cups of fresh, clean snow - don't pack it in, keep it loose.
  • 1 cup of milk
  • 1/2 teaspoon vanilla
  • 1/2 cups sugar

Mix together the milk, vanilla, and sugar. Stir until the sugar is dissolved. Slowly add the snow to your mixture, stirring constantly, until it is as thick as ice cream.  You might need more snow then written above, just add one cup at a time till mixture thickens.

Mint Snow Ice Cream
  • 4 - 5 cups of fresh, clean snow - don't pack it in, keep it loose.
  • 1 cup of milk
  • 1/2 teaspoon vanilla
  • 1/4 teaspoon mint
  • 1/2 cups sugar
  • drop of green coloring

Mix together the milk, flavor, sugar and coloring. Stir until the sugar is dissolved. Slowly add the snow to your mixture, stirring constantly, until it is as thick as ice cream. You might need more snow then written above, just add one cup at a time till mixture thickens.

Collecting snow on the back porch.
Adding the ingredients.


Prepared ice cream (the greener real life)
Yum! (started to melt quickly)

Enjoy the weather,

Chanie

Tuesday, January 25, 2011

Kids In The Kitchen #1 - Kids Can Help Too!

The kitchen is the family hub in my house.  Since I spend so much time there, my kids tend to find their way in there to hang out as well.  Often I find my self tripping over toys one of my boys left behind. (I know, why do I even bother reserving a specific room for toys?)  The kitchen also became the homework room, and also the 'Mommy! I'm bored!" room.  Since it's inevitable that they will end up there, might as well take the opportunity to get them helping out.   Here are a list of ideas that your kids can get you
kids involved.  Feel free to add more ideas in a comment below.
  • Set the table. Putting out placemats or tablecloth is easy even for a preschooler.  You can have you older kids set out the glass cups.
  • Preparing the vegetables.  My younger boys like to stand on a chair or step stool and scrub the vegetables.  My 8 year old can peel and even chop the vegetables.
  • Getting ingredients.  My boys often get the spices and other ingredients from the pantry as needed. They can help put it away after as well.
  • Mixing.  Kids love to stir the ingredients.  You can put the bowl on the table or have them pull a chair up to the counter.
  • Counting. Was that the second cup of flour, or the third?  Let your kids help you keep track.
  • Serving.  Let your kids dish out the food onto each plate and serve it at the table.
You can also take the opportunity to teach your kids about safety in the kitchen.  I will, G-D willing, be writing a post soon about how to teach your children about kitchen safety.

 Most of all, remember to enjoy your time with the kids,

Chanie

Monday, January 24, 2011

Thick And Tasty Butternut Squash Soup

Brrrr!!  It's cold out there.  Temperature today hit -30ºC, without factoring in the windshield. (-30 ºC = -22 ºF)  Want to see just how cold?  It's cold enough to freeze boiling water on contact.  Just check out this iReport video from CNN.  


Now this weather calls for some serious soup. I mean, not just a hot bowl of soup, but one that is thick and tasty to warm you through and through.  I came up with this butternut squash soup recipe a couple of years ago, and it fast became a family favorite for these cold winter nights.  In fact, we enjoy it so much, that I cannot help making it even in other seasons (thank G-D for air conditioning in the summer, so we can actually enjoy our meal)  This soup is super easy, and super tasty.

Thick And Tasty Butternut Squash Soup

2 medium onions - diced
1 medium butternut squash - diced
3 cloves garlic - coarsely chopped
4 1/2 teaspoons chicken soup mix
1 teaspoon salt
1/4 - 1/2 teaspoon crushed black pepper
1 Tablespoon canola oil

Heat canola oil in pot over medium heat.  Saute onions till just starts to brown.  Add butternut squash and garlic and continue to saute for 3 minutes.  Add spices and 5-6 cups water to pot and bring to boil.  Lower to simmer.  Simmer for 30 minutes, until butternut squash is soft.  Blend with an immersion blender in pot or in batches in a regular blender.  Garnish with fresh coarsely crushed pepper.


Hope you're enjoying the cozy indoors,

Chanie

Yummy Chunky Cookies

A friend of mine, Chanie, writes a fun blog which includes recipes and crafts, busyinbrooklyn.com.  Today she posted a scrumptious looking recipe for Cowboy Cookies, one I'm definitely going to try.  I think you might want to take a look at as well.
Cowboy Cookies Recipe


Enjoy,

Chanie

Sunday, January 23, 2011

Old Fashion Cinnamon Buns Plus A Chocolate Buns Variation

After close to a month without an oven, it feels liberating to finally be able to bake again (take that- woman's lib! Yes, I feel liberated to be able to work in my kitchen) without running over to my neighbor. (Don't worry, C.R.,  I'll find other reasons to barge in on you guys)

When ever I'm walking through the food court at the mall, there is one place I always crave to stop and grab a snack (well actually there are 2, I also crave those  ice cream flavors at Gelato La Paysanne, but I'll try making my own homemade gelato another time)  Anyways, back to my mall cravings, my mouth always waters when I walk by Cinnabon.  I really believe these cinnamon buns would give them a run for there money (or so I like to convince myself, since I cannot taste those) These buns, both the cinnamon and chocolate variation, are delicious warm from the oven. 

Note: for best results, always bring all ingredients to room temperature before you begin baking.


Homemade cinnamon buns and chocolate buns.
 Delicious Cinnamon or Chocolate Buns

Yeast Dough
1/2 cup sugar
4 1/2 teaspoons dry yeast
6 1/2 cups all purpose flour
1 1/2 teaspoons salt
1 cup transfat free margarine (warm)
1 1/4 cup apple juice
3 eggs
1/2 teaspoon vanilla

In bowl of stand mixer combine sugar, yeast, 2 cups flour and salt. Place margarine and apple juice in a pot, and cook till warm (dont have to melt margerinne).  Add to flour, yeast mixture.  Beat at low speed for 2 minutes.  Add eggs, vanilla and 2 cups of flour.  Beat 2 more minutes.  Add remaining flour and switch beater to kneading hook.  Knead apx 8 minutes till smooth.
Place dough in well oiled bowl and cover with greased wax paper and towel.  Allow to rise in warm place for 1 hour till doubles.
Divide dough in 2 equal pieces.
Preheat oven to 400*F.  Grease 2 cookie sheets and set aside.
Mix filling ingredients in bowl (ingredients listed below).   Roll out dough to large rectangle 18 x 12.  Spread with filling.  Roll up jelly roll style, holding longer side.  Do the same with second piece of dough and other filling.  Slice each 'jelly roll' into 1 inch slices.  Place on greased cookie sheets. Cover with towel and allow to rise 30 min till doubles. Brushing the buns with egg, at this point, can help the buns keep their shape while cooking, but this step isn't necessary. Bake for 20 minutes till golden.
For glaze, in small bowl, mix icing sugar, a few drops of vanilla and just enough water to make a thick but spreadable consistency.  Spread over warm buns.

Cinnamon Filling
1/4 cup margarine - softened
3/4 cup brown sugar
1 tablespoon cinnamon
1 Tbs. water (more or less, to thin to spread able consistency)

Chocolate Filling
1/4 cup margerine - softened
1 egg white
1 1/2 cup sugar
1/2 cup cocoa
1/2 Tbs. water

Glaze
1 cup icing sugar
a few drops vanilla extract
2-4 teaspoons water

Hope you enjoy,

Chanie

Thursday, January 20, 2011

Keep Those Cookbooks Clean

Ever notice how the cookbooks you love the most, are in the worst condition?  And as hard as you try, the cookbook shelf in the kitchen will never look neat due to so many out of shape cookbooks. 
Well, thanks to Shoshiet from www.imamother.com, I have decided to purchase the wood and acrylic cookbook stand from Amazon: Kitchen Cookbook Stand. I think this might be the solution to my chocolate covered, (if I'm lucky and they are not already stuck) pages of my favorite cookbooks.


Kitchen Cookbook Stand

Till next time,

Chanie

Tu B'shvat Granola Bars

Memories of the dried fruit in little bags, aren't good ones.  My birthday is erev Tu B'shvat, and my mother took that to mean that my birthday bag had to be day appropriate.  You cannot imagine how embarrassing it was for me to bring in those birthday bags.  Everyone else brought in bags filled with candies, and I always thought my mother was being cheap sending in those dried fruits.  Well, after doing my Tu B'Shvat shopping, I can assure you they weren't cheap, although possibly not what most girls looked forward to at a birthday party.

Tu B'Shvat (aside for being the day after my birthday) is never made into a huge holiday in my home.  Maybe a shechiyanu, but not much more.  This year I wanted to make the kids at least notice the day was on the calender, so I prepared a little fruit party.
I made a dried fruit platter, some fresh fruits of Israel and some Tu B'shvat Granola (and some granola with chocolate chips for the picky eater)

Tu B'Shvat Granola Bar Recipe
I came up with this granola recipe after to searching through numerous recipes online, but not finding any that either looked good to me or that I had the ingredients on hand.  In this recipe there are 3 of the Shevas Haminim (7 fruits of Israel), wheat, grapes, and figs but can easily be adjusted to including 5 by adding dates and replacing some of the oats with barley flakes.
Left Chocolate Chip Granola, right Tu B'shvat Granola 

4.5 cups rolled oats
1 cup whole wheat flour
1 tsp. baking soda
1 tsp vanilla extract
2/3 cups butter or margarine
1/2 cup brown sugar
1/2 cup honey
1/2 cup of any combination of fruit (I used 1/4 cup raisins and 1/4 cup fresh diced fig)

Preheat oven to 325*F. Prepare a 9'x13' pan by lightly greasing and line with parchment paper. Mix dry ingredients in a bowl.  Melt butter, honey and sugar in a small sauce pan over low heat until butter is melted.  Remove from fire and stir in vanilla. Add sugar mixture to dry mixture and mix well.  Stir in fruit.  Press firmly into pan and bake for 18-20 minutes, till top in brown. Let cool for 5 minutes, and cut into bars while still in pan.  Allow to cool completely before removing from pan.
Melt chocolate chips in a double boiler (hint: you can place chocolate chips in a ziplock bag and dip into a bowl of hot water - NOT boiling, until melted.) Place chocolate chips in sandwich bag and snip off small corner.  Drizzle over bars.

variation:  Chocolate Chip Granola: substitute 1/2 cup mini chocolate chips for the fruit.


Other pictures from our Tu B'Shvat:

Fresh fruit for Tu B'shvat

Dry fruit Platter

Fruits to enjoy for Tu B'Shvat

Thanks for stopping in,

Chanie

Wednesday, January 19, 2011

Birthday Dinner

So my husband decided to eat out last night, so I would not have to cook my birthday supper.  I thought it's best to go somewhere where I know the kids will actually eat (especially my one really picky eater)  So I suggested Pizza Gourmetti.  It's a cute bistro style pizza shot, where they make everything from scratch.  The pizza was really good.  It's made in a wood fire oven, and it was cheese and delicious.  They were out of  fries since they don't use frozen fries, like most other stores, but make their own oven fries from Idaho potatoes.
After last years failed birthday cake attempted (having to throw out the store bought cake almost whole, 'cuz no one would touch it - my kids have been spoiled by mommy's cakes), my husband decided to take us all for dessert to Exception 2.  They have a nice selection of pastries and cheesecake, sold in portion sizes.  Being that he didn't call in advance, we were shocked to see it closed at a quarter to 7.  (the sign on the door did say they close at 6)  With some disappointment, my boys decided they'd rather go for ice cream at Pizza Pita, then to either get a dairy ice cream cake from IGA, or wait for another day to go out for birthday dessert.  You'd think ice cream would be something easy to please my picky eater? LOL!  We asked for a little on a spoon for him to taste, and he said he LOVED IT! After taking a few licks of his strawberry ice cream on a chocolate and sprinkle dipped, sugar cone, he said he HATES ice cream.  Never try to please this boy, it's impossible!

Till next time,

Chanie

Monday, January 17, 2011

Restaurant Review - Chez Papa Ernie

Today, I got a little break from the kitchen, as my husband and I finally took my eldest to the restaurant for the steak he was promised a couple of months ago.

We took him to Chez Papa Ernie, on Decarie Blvd. in Montreal.  The restaurant is on the first floor of a duplex.  A short walk up from the side walk.  The restaurant doesn't have parking, but offer valet parking during dinner time.  They don't have a liquor licence and are BYOB.  The ambiance is  nice.  It's a small cozy place decorated like a ranch.  The whole room is hand painted with lots of detail (by artist Chaim Teitelbaum, my sister's brother-in-law)

We all ordered steak.   They put a very generous portion of hors d'oeuvres , assorted salads with both flat breads and rolls plus mini egg rolls and mini knishes on the table.  Everything tasted delicious.  I ordered a bean and barley soup, which was very taste and my husband and son ordered chicken noodle soups, which also was pretty good.  I wasn't as impressed with the main course.  I found the steak to be dry, and my baked sweet potato to be a bit under cooked. The roasted vegetables, while slightly under cooked, was still pretty good, and they only thing I actually finished on my plate.  My husband and son however seemed to enjoy the steak (with split hotdog on top?) as well as their side dishes.  My husband got mashed potato, which was actually really good, in presentation and taste, was served with fried shallots.  Dovid ordered fries, which isn't really hard to get right. All in all, we had a great night out, regardless of the food. (best part being that I was didn't have to spend time in the kitchen)
And guess what... my husband wants to go out tomorrow again... in honor of my birthday.

Till next time,

Chanie

Saturday, January 15, 2011

Lick Your Fingers Stove Top Veal Ribs

Made some veal ribs for Shabbat dinner, the verdict could be seen by the empty dish, even though it was the third course, after plenty of salads, fish and a bowl of steamy hot chicken soup.
My oldest son is a definite carnivore.  He LOVES meat!  And this passed the test, as I could see from his sticky fingers.

Lick Your Fingers Stove top Veal Ribs
2 lbs. veal ribs
1 large onion - thinly sliced
3 cloves garlic - crushed
1/4 cup soy sauce
1/4 cup honey
1/4 cup ketchup
1/4 cup orange juice

In large frying pan, sear veal ribs in a bit of hot oil on both sides to seal in moisture.  Remove to plate.  Add sliced onion to pot, stir fry till browns slightly. Add garlic, and saute for 1 min.  Return veal to pot.  Mix the 4 sauce ingredients in small bowl or jar.  Pour over ribs.  Bring to boil then lower to simmer for 1 hour (or until meat reaches your preference of done.)

Thanks for joining me,

Chanie

Friday, January 14, 2011

When Life Gives You..... Marshmallow Cream, Make Truffles

Earlier this week, I made an attempt at making my own marshmallows, from scratch.  The plan was to make chocolate covered marshmallows. It was more of an experiment, since the recipe called for gelatin, and kosher gelatin (made from tapioca) isn't the same thing.  But unless I tried, I could never be for certain that it wouldn't work.
Everything looked like it was going well, I left it out over night, to dry up, as per the directions.  In the morning, I come back to see that it didn't harden at all.  However, the texture and taste was exactly that of marshmallow fluff.  Since there wasn't going to be chocolate covered marshmallows, I decided to make marshmallow chocolate truffles.  My kids are loving them, so I guess they were a success.

Marshmallows (failed recipe became marshmallow cream)
1/2 cup plus 1/3 cup room temperature water
2 tablespoons plus 1/2 teaspoon unflavored gelatin (I used the Leiber's made from tapioca)
2 cups sugar
1/2 cup light corn syrup
1/8 teaspoon salt
2 large egg whites, at room temperature
3/4 teaspoon vanilla extract
Cornstarch, sifted

Place a half cup water in a bowl and sprinkle with gelatin.  Allow to soften for 5 min.
In a medium pot, combine sugar, corn syrup, remaining water, and salt.  Using a candy thermometer, cook over medium heat until it reaches 240°F.

Sugar mixture reaches 240*F
Remove from heat and whisk in gelatin until combined. Cover the pot and leave on turned off beater to keep warm while preparing the egg mixture.
In a stand mixture, whip egg Whites on high until soft peaks form. Pour a thin, steady stream of sugar syrup over eggs while mixer is still running. (try to be carefully not to pour on side of bowl or on whip)  Mix till side of bowl is cool to touch (can take 5 minutes or more)  Beat in the vanilla.  The marshmallow should be thick and glossy and form medium-firm peaks.
Grease 9" x 13" and put parchment paper on the bottom. Pour marshmallow in to pan, and smooth with a spatula. . Lightly dust the top with cornstarch.  Allow to sit over night at room temperature.

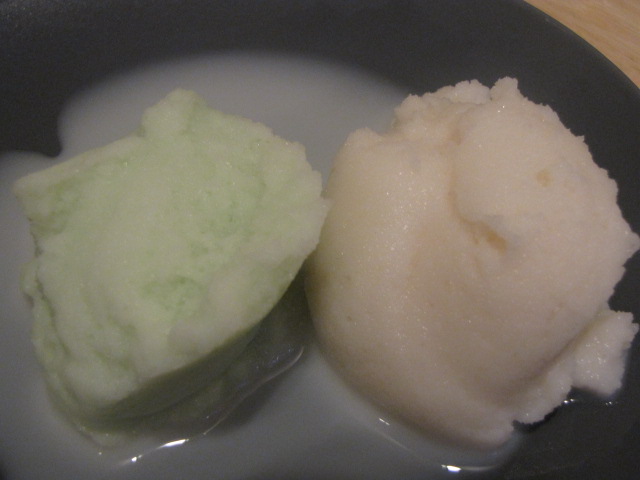
The marshmallows looked perfect till this point
Sprinkle a piece of parchment with cornstarch, run a spatula around the edges of the marshmallow, and turn in over on top of the parchment. Peel the parchment off of the marshmallow if it comes loose from the pan. Use a long, sharp, thin-bladed knife to cut into about forty 1 1/2-inch squares.

The texture of the marshmallows the next day.
If you are successful in getting this far with kosher gelatin, please let me know what you did.  When I came back in the morning, the texture remained the same as the night before.  And so my next recipe was formed.
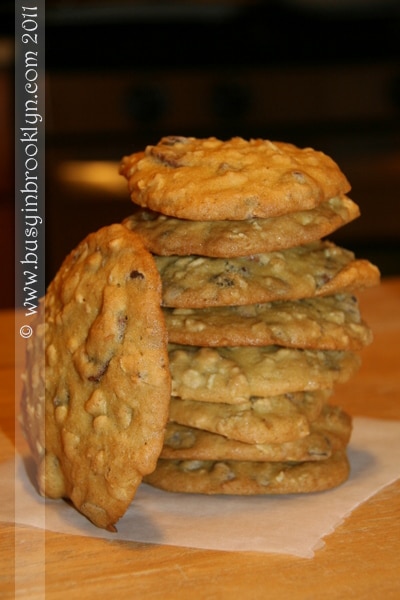
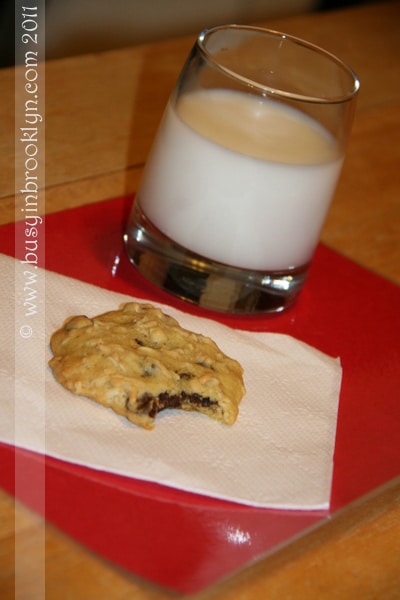
Chocolate Truffles
16 oz chocolate chips
1 recipe marshmallow cream from above or a 7 1/2 oz jar marshmallow fluff
icing sugar - sifted
cocoa - sifted

Melt chocolate chips over hot water (not boiling) on double boiler.  Remove from heat and stir in marshmallow cream.  When cools slightly, form into 3/4" - 1" balls.  Roll balls in icing sugar or cocoa/icing sugar mixture.  Place in fridge for an hour to firm.


The delicious end result.

Thanks for stopping by,

Chanie

Thursday, January 13, 2011

Jalapeno Eggplant Salad

This evening, when making my salads for Shabbat, I was inspired to make a change from the norm and created a whole new dish.  I like this enough to call it a keeper, we will have to wait till tomorrow night for my husbands verdict.


Jalapeno Eggplant Salad
1 large onion - diced
6 cloves garlic - crushed
2 chinese eggplant - diced
1-2 jalapeno - minced
salt and pepper to taste

Fry eggplant till golden color, remove from pot.  Brown onion in a small amount of oil till translucent, just starting to brown.  Return eggplant to pot. Add crushed garlic,  and jalapeno.  Stir fry till jalapeno softens slightly.  Season with salt and pepper to taste.
Serve with challah or bread.

Enjoy,

Chanie

Wednesday, January 12, 2011

Dinner Tonight - Grilled Chicken Over Seseame Noodles

Tonight's dinner is compliments of my neighbor, B.M. and the Kosher By Design cookbook by Susie Fishbein.  
Kosher by Design: Picture Perfect Food for the Holidays & Every Day

Chatting with my neighbor, this morning, on the phone, she mentioned that she made the Grilled Chicken Over Sesame Noodles (page 27) and even her fussy eaters had seconds. 
Now I've got myself some fussy eaters, and I also happened to have taken out chicken cutlets for supper, and so I took up the challenge of feeding my kids this new dish.
I followed the recipe, with the only exception of opting for whole wheat pasta in place of the regular, and I boiled the leftover marinade to drizzle on top.


The spaghetti was served tossed in a sesame oil, soy sauce dressing.  And although my kids didn't mind the taste.  They said the smell of the sesame oil was too much for them to take.
The chicken was marinaded for a few hours in a teriyaki/soy sauce marinade, and that was  a big hit.  I will definitely be making the chicken again, but I think I will next time make up my own sauce to mix into the spaghetti (I do like the way it looks together, so I'll stick with a soy sauce type dressing, but much milder)
The best part of this dinner, was the actual prep time, took under 30 minutes to make (not counting marinading time)

Thanks for joining me,

Chanie

Non-Dairy Ice Cream Sandwiches

Another day without an oven...  The appliance repair man, reported back to me a couple of days ago, only to tell me that the the part that needs to be replaced cost $345!  Sears had a fairly decent range on special for $399... fix the old, or buy  new?    Of course, I took the latter, only to find out that it's on back order till January 28th.  I found a similar range on the Sears website, and the woman we are working with was able to match the price.  Only that was isn't available till Monday.  I was offered one without Shabbat mode to receive immediately, but turned it down.  I lasted this long, I'll last one more weekend.

Going through me freezer this week, I discovered oatmeal cookies and figured I could do something with those.  What I (an my children) like about these cookies, are that even straight from the freezer, they taste great and are soft enough to chew.  This gave me the idea to combine them with me never freeze hard, pareve ice cream, to make ice cream sandwiches that are easy to eat.


Oatmeal Cookies  (makes apx. 4 dz cookies, or 2 dz. sandwich cookies)
2 cups flour
1 cup sugar
1 cup brown sugar
1 tsp. baking powder
1 tsp baking soda
1/2 tsp salt
1/2 tsp cinnamon
1 cup margarine
2 eggs
1/2 tsp vanilla
1 1/2 cup rolled oats

preheat oven to 375*F.  Mix all dry ingredients. Add rent of ingredients besides the oats, and mix well.  Roll the dough into 1 inch balls and place on ungreased cookie sheet, flatten slightly with finger.  Leave room for the cookies to expand.  Bake 10-12 minutes until tops are browned (they will feel to soft, cookies only harden as the cool)

Non-Dairy Vanilla Ice Cream
6 eggs separated
1 cup icing sugar
6 Tbsp. light corn syrup
2 tsp. vanilla
16 oz non-dairy dessert topping

Beat egg whites and confectioners sugar till firm and shiny. Add corn syrup, vanilla and egg yokes.  Mix till combined.
In a separate bowl, whip topping till it forms firm peaks.  Fold both mixtures together.  Freeze over night till firm.
Please note:  raw eggs should not be served to very young kids or the infirmed. You can replace this ice cream with another ice cream of your choice, with similar results.

To From The Sandwiches
Lay 1/2 the oatmeal cookies on the counter.  Put one scoop of ice cream on each.  Place second cookie on top.  Press down, slightly, top cookie to flatten ice cream scoop.  Roll sides of sandwich cookie in sprinkles.  Return to freezer until ready to serve.

Note:  The thing that makes these sandwich cookies so delicious also works to their disadvantage.  The melt in your mouth effect also means these can not stay out long, or they will melt.  Remove from freezer just before serving.

Enjoy,

Chanie

Monday, January 10, 2011

Fudge Covered Cheesecake... YUM!

My husbands birthday was yesterday, January 9th.  Originally, my idea was to decorate a cake and arrange with his assistant to drop it off for him at work today (since there was obviously no work on his birthday)
Well, you all know my oven story...  hard to bake a cake without an oven.  Not saying it's impossible, just that it's hard (haven't gotten into the whole raw diet thing, yet) 
Yesterday, while my husband spent the day painting the new house, I decided I have to give him something for his birthday.  I do have  a toaster oven, but that's not very ideal for a cake.  However, I have baked cheesecakes in it... and so a cheesecake it is.
I made the Fudge Covered Brownie Cheesecake from the Kosher By Design Entertains cookbook by Susie Fishbein.  Truthfully, I'm the type of person who doesn't follow recipes in cookbooks and use them more for inspiration.  However, this is a recipe that I love, just the way it is and haven't really tweaked it at all (except when I don't have ingredients on hand and look for a similar substitute.) I do love the presentation in the Kosher By Design Series.
I'm not going to post the recipe, for possible copyright infringement, but if you want information on this delicious cheesecake, just post a comment below and I will try to help you out.
You can check out the cookbook on Amazon:
Kosher By Design Entertains: Fabulous Recipes For Parties And Every Day


At home, we celebrate the birthday according to the Hebrew calender.  My husbands birthday (10th of Tevet)  fell out this year on December 17th.  My boys made a banner to hang in the kitchen and I provided the cake.  Put an edible image of 3 of the dearest things my husband has... our boys!  We made the "surprise" party the night before, being that my husbands birthday is a fast day.  (Imagine...never being able to party on your birthday)


The birthday poster my boys made.


Thanks for visiting,

Chanie

Saturday, January 8, 2011

Lox Salad With Poppy Seed Dressing

12 years ago, I spent a year in a seminary in Johannesburg, South Africa.  One family I occasionally went to for Shabbat dinner, would make a delicious lettuce salad with lox in it.  I have yet to find a recipe for this salad.  Yesterday, I decided to come up with my own variation of this dish.

Lox Salad With Poppy Seed Dressing
1 medium head romaine lettuce
1 pint grape or cherry tomatoes - halved
8 oz. lox - cut in small pieces (or for a more economical salad, use lox trimmings)
1/2 red onion - thinly sliced (I didn't have any in the house, but I think the salad could use it, for both color and taste)

Poppy Seed Dressing
6 Tbsp Sugar
2/3 cup oil
1/3 cup vinegar
3 Tbsp mayonnaise
2 cloves garlic - crushed
1/2 tsp. dry mustard
1/2 Tbsp poppy seeds
salt and pepper to taste.

Shake all dressing ingredients in a jar with lid on.  Pour over salad just before serving

Have a good week,

Chanie

Thursday, January 6, 2011

Awake From A Two Year Coma

So the repairman came and went.  He was the barer of good and bad news. 
I’ll get over the bad news first.  The fuses my husband checked and found to be working were not for the oven, they were for the plugs on top of the oven.   The control panel for the oven (where there is the buttons to bake/broil/self clean) has power going into it but none coming out.  Basically I need a whole new part, and he is not sure if it’s an expensive part… I await his call with a price.  So still no oven, and another Shabbat dinner to cook, without the use of an oven (at least the stove top works)
And for the good news… 2 years ago, my kitchenaid mixer came to a stubborn halt.  No gentle (or not so gentle) nudging could get it to work again.  I called Kitchenaid, only to be told that I over used, it was made to mix cakes and occasionally bread, not on a regular basis (um.. maybe they should have that written on the box, because I specifically bought it for bread making)  They told me they would take a look at it to see if its fixable for a cost of $150 + shipping + whatever the repairs actually cost.  I decided Kitchenaid was history in my book, and bought myself an Electrolux mixer. 
I love my Electrolux (which can knead large amounts of bread dough with ease), but do sometimes miss my Kitchenaid for Cakes.  The past 2 years the Kitchenaid has had it’s vacation under my sink, where it was all but forgotten.  I asked the repairman, who came today, if he knew mixers at all.  He didn’t, but agreed to look at it anyways.  He took the machine apart and found the broken piece which he said I could get at any parts store.  When he put it back together my machine sprung back to life!!!   So now I have a Kitchenaid again, but no oven, so cant try it out yet.   (and it cost me only $40 for the service call, for both the oven and the mixer!)  (checked online, and the replacement part cost $31)

My Kitchenaid mixer came out of a 2 year slumber!
Check out the 2 mixers on Amazon:

KitchenAid KP26M1XDP Professional 600 Series 6-Quart Stand Mixer, Dark Pewter

Electrolux White Assistent Stand Mixer 8 Qt.

Thanks for stopping by,

Chanie

The Hunt For Cookies

They say you should find good in every situation.  I'm actually benefiting from the lack of an oven, maybe I should cancel the repairman, who is scheduled to come this morning to look at it.  My freezer is always full of baked goods, and my family is horrible with the FIFO concept (first in, first out).  With the lack of an oven the past 2 weeks, finally my freezer is being emptied out. 
This morning my kids scoured the freezer for something special to put in their lunch boxes.  They found individually wrapped pirate cookies that I cannot put an exact date on.... but I'm sure it wont harm them in anyway.


Till later,

Chanie

Wednesday, January 5, 2011

Sweet Deals

I love saving money (now who doesn't, as long as it doesn't take too much out of you)  Before I left for Vegas, I found 2 pairs of dress boots I liked, in Winner's.  One was $149 and the other $99, I liked the more expensive ones better, but not $50 more, so I bought the cheaper ones.   In Arizona, last week, I found the more expensive ones for $59!  I may have only lost money at the slot machines, but coming across those shoes made me feel like I came out a winner.

Nine West boots for $59

This past Monday, I decided to take advantage of the after Christmas sales and spent the day in Carrefour Laval.  Wasn't the best shopping day ever, but I did get some deals.  Shopped for the boys for t-shirts in Children's Place ($6) and Old Navy ($1.99!) and some socks at $1 each.  My husband picked up a sweater, and some Clark's he had his eye on.  I found another pair of boots for myself.  Costed me $40, down from $165.

Suede boots, over the knee or fold over.
Till later,
Chanie

Tuesday, January 4, 2011

Disaster Averted

I was hired to bake a cake for a Bat Mitzvah that was to take place last Thursday.  The Bat Mitzvah girl sat with me for some time designing the cake to her specifications.  She wanted the cake to have a globe on it and 2 candles with the line “מעט אור דוחה הרב חושך” “A little light dispels a lot of darkness” Being that I was to be out of town till Wednesday (the day before the event)  I planned to bake the cake in advance of my vacation, freeze and take it out when I get back to decorate it.  I baked the bottom tier but just as I was baking the top globe tier, my oven stopped working.  (At the time I also had challah sitting on my counter waiting its turn in the oven)  I called the mother of the girl and assured that I will figure something out, but I cannot promise what it will be.
I returned from vacation with a whole bunch of sketches but not quite sure what I’d do.  That night the Bat Mitzvah girl and her mom came over and with their help and understanding we created a new design sketch.  Something I could make with cakes I had in my freezer. Thank G-d, the cake came out to their satisfaction. 

I want to give a shout-out to my dear neighbor, CR, whom without her, my challah would not have been baked.

Thanks for stopping by,
Chanie

Welcome

Hi!  My name is Chanie.  I’m a SAHM with 3 young boys.  My day is filled with house cleaning, cooking, errands, entertaining and of course baking.  I love to bake, but more than baking, I love the satisfaction on people’s faces after they eat a delicious dessert.  I’m also all about presentation, and putting those 2 together, I began my passion for decorating cakes.  I now run Sweet Temptations, a small home business/hobby selling custom cakes, cookies and cupcakes.
My blog will be focused on my baking, cooking, and home decorating (come along as I attempt to fix-up my just purchased home), but I’m not going to limit it to just those topics. 
I hope you’ll come by often to view my blog,
Chanie